Make one key (Webflow calls it an API token) in your site's settings, with Sites read-only and CMS read and write, and paste it into RunOctopus. Articles arrive in your Webflow blog as drafts. Only a Webflow site administrator can make the key.
The short version. Switch to Full article for every detail.
Webflow lets you make a key that lets one app work on one site. You make it in your site settings and paste it into RunOctopus. After that, each article shows up in your Webflow blog as a draft for you to check and publish.
The plain version, no background needed. Switch to Full article for every detail.
To connect your Webflow site, you make one key in your Webflow site settings and paste it into RunOctopus. Webflow calls this key an API token: a long code that lets one app work on one site. Ours lets RunOctopus read your site and add blog posts, and nothing else.
Once you're connected, each article Ollie (our AI writer) makes for you goes into your Webflow blog as a draft. Nothing goes live until you publish it, or until you tell us to publish for you.
Who can make the key
Webflow says only site administrators can make one. If you're not an administrator on the site, send this page to the person who is.
The steps, one at a time
- When we ask "What's your website address?", type your address. We tell you it runs on Webflow, and a box opens for your key.
In a new tab, open Webflow. In your workspace, find your site and click the gear icon to open Site settings.
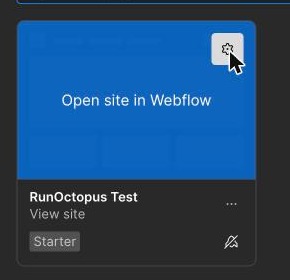
The Webflow dashboard with the mouse on the gear icon at the top right of the site's card In the left menu, choose Apps & integrations, then scroll down to API access.

Webflow's API access section, with the Generate API token button on the right - Click Generate API token.
- Give it a name you'll recognize, like
RunOctopus. Choose what it can do. We need only two, and everything else stays off:
- Sites: Read-only
- CMS: Read and write (the CMS is where your blog posts live)
- Everything else: No access
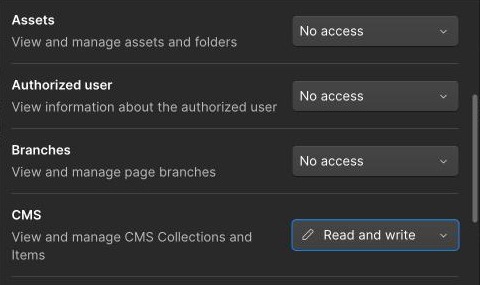
Webflow's Generate an API Token window with CMS set to Read and write 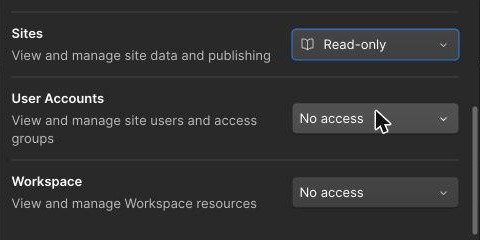
The same window further down, with Sites set to Read-only Click Generate token, then copy the token.
Webflow shows it only once, so copy it now with the copy icon at the end of the box.
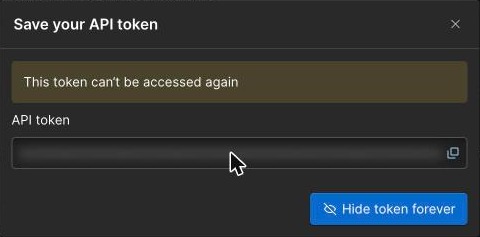
Webflow's Save your API token window. The token itself is hidden in this picture; on your screen it shows as a long code, with a copy icon at the right - Back in RunOctopus, paste it into the box called Your Webflow key and tap Connect. We check the key with Webflow, and when it works you'll see Connected. Your Webflow site is linked to RunOctopus.
On the All Eight plan (our done-for-you plan), you can also tap Connect it for me instead, and our team sets it up with you within one business day.
Where your articles land
In Webflow, open the CMS and pick your blog's Collection (a Collection is Webflow's word for a list, like your blog posts). Each new article waits there marked Draft. Look it over and publish it when you're happy.
You choose how it works in RunOctopus under Settings, then Connections, in the card Your Webflow blog:
- Where your articles go. We find your blog ourselves. If your site has more than one place that could hold blog posts, we ask you to pick.
- Publish new articles live automatically. Off (the starting setting): each article waits as a draft in Webflow. On: new articles go live on your site without you opening Webflow.
Good to know
- Keep it private. The key works like a password for that one site. Paste it only into RunOctopus, and please don't email it to anyone. We keep it encrypted.
- Lost it before you pasted it? Make a new one the same way.
- Up to 5 keys per site. Webflow allows five. If you hit the limit, delete one you no longer use.
- Changed your mind? Delete the key in the same API access section in Webflow, and our connection stops right away. Disconnecting in RunOctopus also deletes our copy of the key.
If something doesn't look right
- "Webflow didn't accept that key"? It may be missing a few letters. Copy it again, or make a new one and paste that.
- "That key can't reach your blog posts yet"? The key needs CMS set to Read and write. Make a new key with that setting and paste it.
- "We couldn't find a site with that key"? Make the key in the settings of the same site whose address you typed.
- No blog on your Webflow site yet? Add a blog Collection in Webflow, then come back. Tell us in the app if you'd like a hand.
- Anything else, tell us in the app. We're here, and we'll sort it out with you.
You're in: what happens next
Once your Webflow site is connected, head to Install your content to see how your first pieces get onto your site.
Was this page helpful?